Nextflow
Overview
What is Nextflow?
Nextflow is a workflow management tool that allow users to easily write data-intensive computational pipelines. These pipelines, or workflows as they are also called, have the following key features:
- Sequential processing of files
- Usually requires more than one tool
- Multiple programming languages
- Most times each sample is processed individually
- Compute resource intensive
- For example, in computational biology pipelines, there is often a process known as sequence alignment, which refers to the process of arranging the primary sequences of DNA, RNA, or protein to identify regions of similarity that are of interest
- This alignment process could take 16 cpus, 60 Gb RAM, 4-24 hours, 30Gb of disk space per sample
Why do we care about these pipelines?
Reason 1: Reproducibility
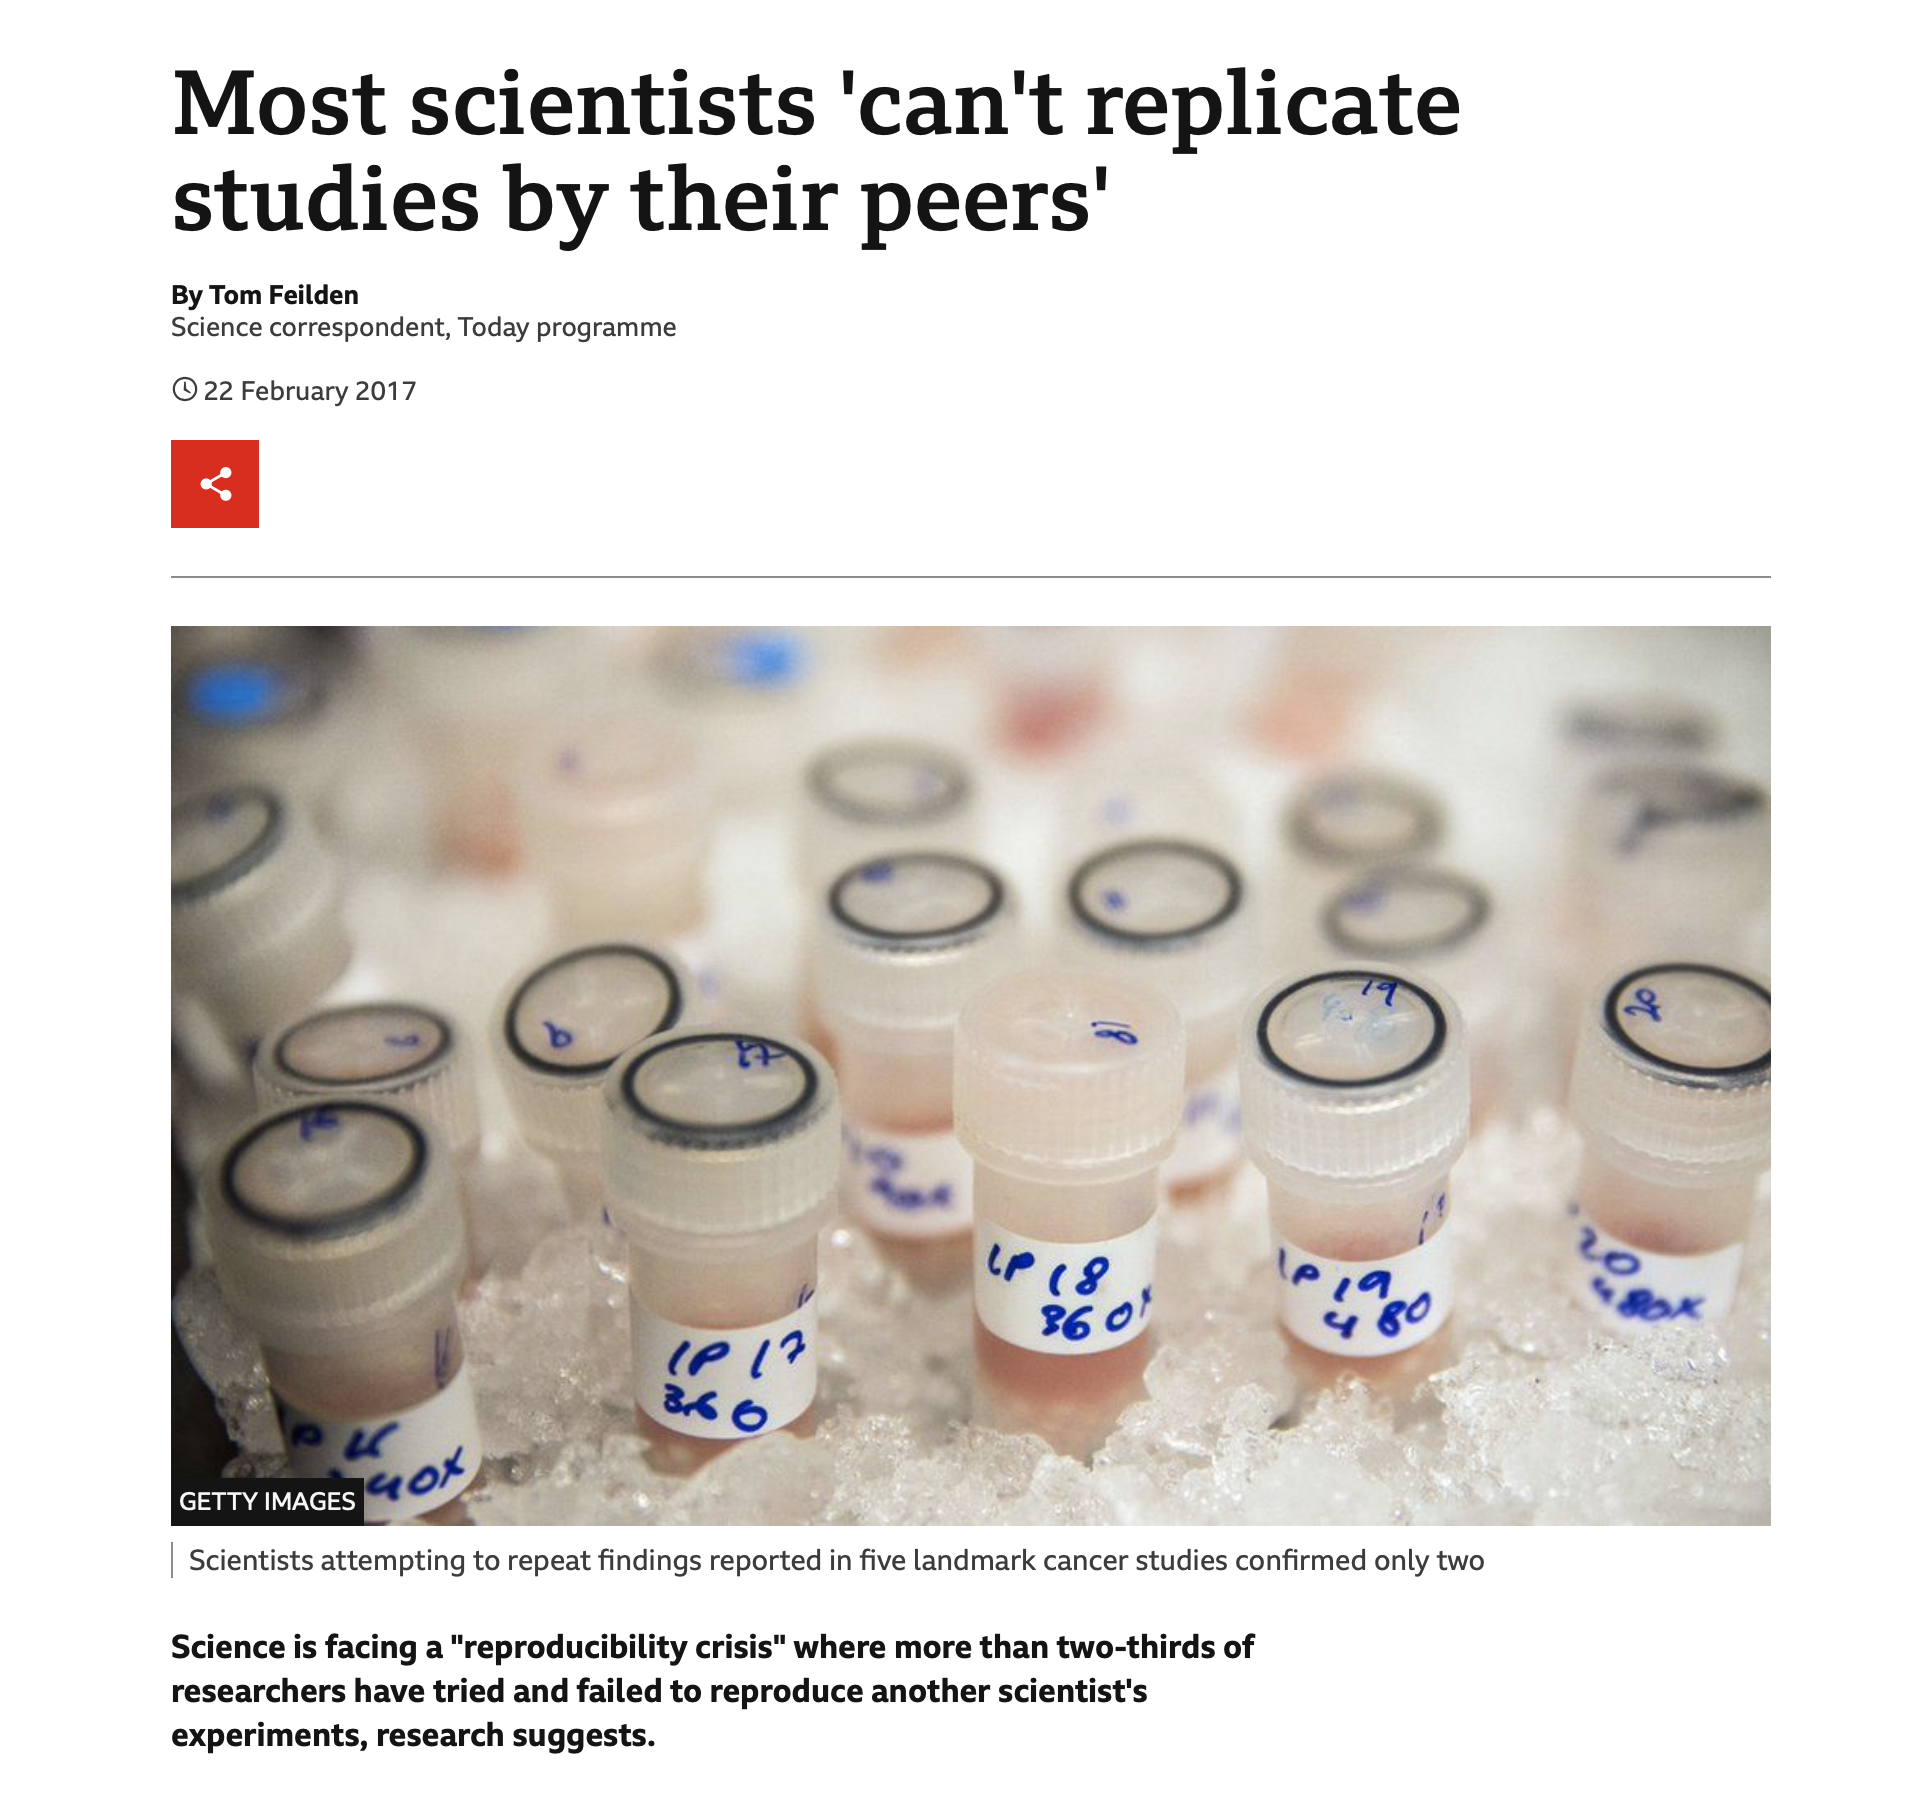
The journal Nature published a survey that found that more than 70% of researchers have tried and failed to reproduce another scientist's experiments. This trend is hugely problematic because we then can't trust the findings from many studies enough to use them to make data-driven decisions. In short, we need tools and standards that help address the reproducibility crisis in science!
Pipelines created with Snakemake and Nextflow incorporate version-control and state-of-the-art software tools, known as containers, to manage all software dependencies and create stable environments that can be trusted to reproduce analyses reliably and accurately.
Reproducibility is important for producing trustworthy research!
Reason 2: Portability
What if we need to perform analyses with more resources?
This type of scenario would require us to move our analyses to a different environment, for example, a High Performance Computing (HPC) cluster environment.
An important feature of Snakemake and Nextflow workflow management tools is that they enable users to easily scale any pipeline written on a personal computer to then run on an HPC cluster such as OSCAR, the HPC cluster we use at Brown University. So now we can run our pipelines using high performance resources without having to change workflow definitions or hard-code a pipeline to a specific setup. As a result, the code stays constant across varying infrastructures, thereby allowing portability, easy collaboration, and avoiding lock-in.
In short, we can easily move our multi-step analyses (i.e., pipelines) to any place we need them!
So Let's See How All This Works!
Our Starting Point
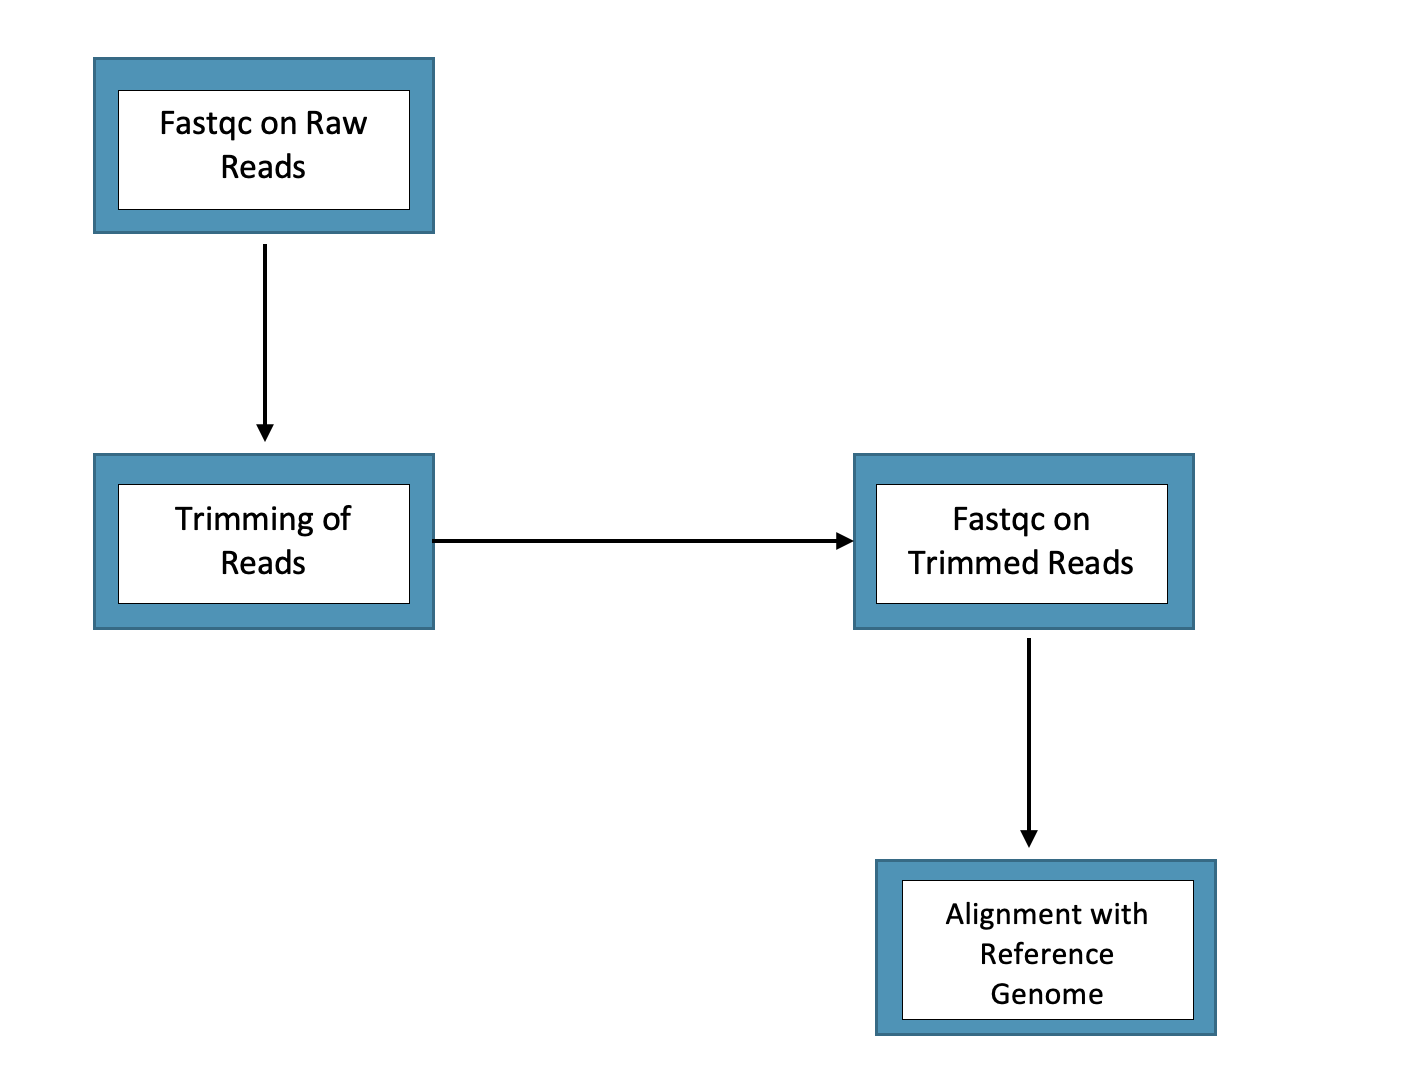
Drawing from the field of computational biology, say we have samples from reduced representation bisulfite sequencing (RRBS data) that we need to process on OSCAR by performing the following set of actions (note: do not focus so much on what the steps are but instead that we are performing a sequence of actions):
What do you do in this situation?
The Naive Approach: Cobbling Multiple Shell Scripts
One solution would be to write a bunch of shell scripts that use various software tools to process the data on the cluster in the ways that we need.
For example, if we need to run fastqc (for raw and trimmed reads steps in diagram), trim galore (for trimming of the reads step), and then an alignment (for the last step in the diagram), we could just write a shell script for each of these steps - so a total of 4 shell scripts in this case - where we have various inputs and outputs associated with each step. This might roughly look something as follows:
Script 1: For Fastqc
#!/bin/bash
#SBATCH -t 48:00:00
#SBATCH -n 32
#SBATCH -J rrbs_fastqc
#SBATCH --mem=198GB
#SBATCH --mail-type=ALL
#SBATCH --mail-user=jordan_lawson@brown.edu

source /gpfs/runtime/cbc_conda/bin/activate_cbc_conda
conda activate fedulov_rrbs
for sample in `ls /gpfs/data/cbc/fedulov_alexey/porcine_rrbs/Sequencing_Files/*fastq.gz`
do
align_dir="/gpfs/data/cbc/fedulov_alexey/porcine_rrbs"
fastqc -o ${align_dir}/fastqc $sample
done
Script 2: For Trimming
#!/bin/bash
#SBATCH -t 48:00:00
#SBATCH -n 32
#SBATCH -J trimmomatic_update
#SBATCH --mem=198GB
#SBATCH --mail-type=ALL
#SBATCH --mail-user=jordan_lawson@brown.edu

source /gpfs/runtime/cbc_conda/bin/activate_cbc_conda

for sample in `ls /gpfs/data/cbc/fedulov_alexey/porcine_rrbs/trim_galore/*_trimmed.fq.gz`
do
    dir="/gpfs/data/cbc/fedulov_alexey/porcine_rrbs/trimmomatic"
    base=$(basename $sample "_trimmed.fq.gz")
    trimmomatic SE  -threads 8 -trimlog ${dir}/${base}_SE.log $sample ${dir}/${base}_tr.fq.gz ILLUMINACLIP:/gpfs/data/cbc/cbc_conda_v1/envs/cbc_conda/opt/trimmomatic-0.36/adapters/TruSeq3-SE.fa:2:30:5:6:true SLIDINGWINDOW:4:20 MINLEN:35
done
Script 3: For Fastqc on trimmed reads
#!/bin/bash
#SBATCH -t 24:00:00
#SBATCH -n 8
#SBATCH -J retrim_fastqc_update
#SBATCH --mem=16GB
#SBATCH --mail-type=ALL
#SBATCH --mail-user=jordan_lawson@brown.edu

source /gpfs/runtime/cbc_conda/bin/activate_cbc_conda
conda activate fedulov_rrbs
for sample in `ls /gpfs/data/cbc/fedulov_alexey/porcine_rrbs/trimmomatic/*_tr.fq.gz`
do
trim_qc_dir="/gpfs/data/cbc/fedulov_alexey/porcine_rrbs"
fastqc -o ${trim_qc_dir}/trimmomatic_qc $sample
done
Script 4: For Alignment
#!/bin/bash
#SBATCH -t 24:00:00
#SBATCH -N 1
#SBATCH -n 16
#SBATCH -J bismark_align_update_redo
#SBATCH --mem=160GB
#SBATCH --mail-type=ALL
#SBATCH --mail-user=jordan_lawson@brown.edu
#SBATCH --array=1-18
#SBATCH -e /gpfs/data/cbc/fedulov_alexey/porcine_rrbs/logs/bismark_align_%a_%A_%j.err
#SBATCH -o /gpfs/data/cbc/fedulov_alexey/porcine_rrbs/logs/bismark_align_%a_%A_%j.out

source /gpfs/runtime/cbc_conda/bin/activate_cbc_conda
conda activate fedulov_rrbs
input=($(ls /gpfs/data/cbc/fedulov_alexey/porcine_rrbs/trimmomatic/*_tr.fq.gz)) # using the round brackets indicates that this is a bash array
bismark -o /gpfs/data/cbc/fedulov_alexey/porcine_rrbs/alignments --bowtie2 --genome /gpfs/data/shared/databases/refchef_refs/S_scrofa/primary/bismark_index --un --pbat ${input[$((SLURM_ARRAY_TASK_ID -1))]}
Problems with the Above Naive Approach
Using multiple shell scripts to create a makeshift pipeline will work, but it is highly inefficient, can get complicated fast, and there will be a few challenges you have to manage, such as:
- Making sure you have the appropriate software and all dependencies for each step in the analysis - this can be a lot to stay on top of if you have a pipeline with a lot of steps! (imagine a 10 step process)
- Portability! Building and running on different machines is much more work
- Specifying where your output will go
- Calling in the appropriate input (which is often the output from a previous step)
- Handling where log files go
- More labor intensive - we have to stay on top of jobs and monitor when each step finishes and then run next
A Smarter Approach: Using the Nextflow Workflow Manager!
The solution for processing your data in a much more efficient manner that handles the aforementioned issues is workflow management tools, such as Nextflow. Let's now learn how to use Nextflow...
Tutorial: Using workflow management tools on OSCAR
Workflow management tools are software that allow you to write more efficient, portable computational pipelines. As a result, you are able to optimize your workflows while maintaining reproducibility and rigor. Note that there are many workflow management tools available to researchers, but the tool we will focus on learning about today is Nextflow.
Step 1: The Setup
Let's first discuss setting up our environment on OSCAR so that we can get Snakemake up and running.
At this point, I am going to open my terminal on Open OnDemand (OOD) so that I can walk you through and show you how each of these steps and files below look. Feel free to open your terminal as well and follow along. To do so, you can go to OOD at https://ood.ccv.brown.edu and under the Clusters tab at the top select the >_OSCAR Shell Access option. All files used today can be found on GitHub in the folder at: https://github.com/compbiocore/workflows_on_OSCAR
Step 1a: Download the Nextflow Configuration Script from the compbiocore/workflows_on_OSCAR repo (see link above for location of repo):
[pcao5@node1322 ~]$ cd ~/
[pcao5@node1322 ~]$ git clone https://github.com/compbiocore/workflows_on_OSCAR.git
[pcao5@node1322 ~]$ git clone https://github.com/compbiocore/workflows_workshop.git
Step 1b: Using the install.sh script, install the compbiocore/workflows_on_OSCAR package:
Run the following command in your home directory on OSCAR:
bash ~/workflows_on_OSCAR/install_me/install.sh && source ~/.bashrc
For the 1st installation prompt, input NextFlow:
Welcome to a program designed to help you easily set up and run workflow management systems on OSCAR!

Please type which software you wish to use: Nextflow or Snakemake? Nextflow
For the 2nd installation prompt, input your GitHub username (e.g., paulcao-brown):
Nextflow software detected, initializing configuration...
What is your GitHub user name? paulcao-brown
What is your GitHub token (we will keep this secret) - [Hit Enter when Done]?
Step 1c: Create a new GitHub Token and enter it:

Step 1d: Complete the Installation
Currently the Nextflow default for HPC resources is: memory = 5.GB time = 2.h cpus = 2
Do you want to change these default resources for your Nextflow pipeline [Yes or No]? No
Keeping defaults!

OUTPUT MESSAGE:

                ******************************************************************
                 NEXTFLOW is now set up and configured and ready to run on OSCAR!
                ******************************************************************


Your default resources for Nextflow are: memory = 5.GB time = 2.h cpus = 2


                To further customize your pipeline for efficiency, you can enter the following
                label '<LabelName>' options right within processes in your Nextflow .nf script:
                1. label 'OSCAR_small_job' (comes with memory = 4 GB, time = 1 hour, cpus = 1)
                2. label 'OSCAR_medium_job' (comes with memory = 8 GB, time = 16 hours, cpus = 2)
                3. label 'OSCAR_large_job' (comes with memory = 16 GB, time = 24 hours, cpus = 2)


README:

Please see https://github.com/compbiocore/workflows_on_OSCAR for further details on how to add the above label options to your workflow.

Note the setup is designed such that pipelines downloaded from nf-core with their own resource specs within the .nf script will override your defaults.

To run Nextflow commands, you must first type and run the nextflow_start command.

To further learn how to easily run your Nextflow pipelines on OSCAR, use the Nextflow template shell script located in your ~/nextflow_setup directory.
Step 2: Run a 'Hello World' Example
To start and get us oriented, we will run a simple piepline example. Create a file called hello_world.nf and inside of it put the following contents:
2a. Our hello_world.nf file:
#!/usr/bin/env nextflow
nextflow.enable.dsl=2

params.name = "World"

process sayHello {
  input:
    val name
  output:
    stdout
  script:
    """
    echo 'Hello ${name}!'
    """
}

workflow {
  sayHello(params.name) | view
}
2b. Launch the Workflow:
Now cd to wherever the hello_world.nf file has been created and located and run the following:
nextflow run hello_world.nf
2c. Workflow Output:

2d. Launch the Workflow with Custom Parameter:
Oftentimes (depending on how their constructed) workflows can be ran with custom parameters using Nextflow. For hellow world example, we can feed it a name using the --name parameter as follows:
nextflow run hello_world.nf --name "Bleuno Bear"
2e. Workflow Output with Custom Parameter:

2f. Inspect What is Going On Underneath the Hood of the Workflow:
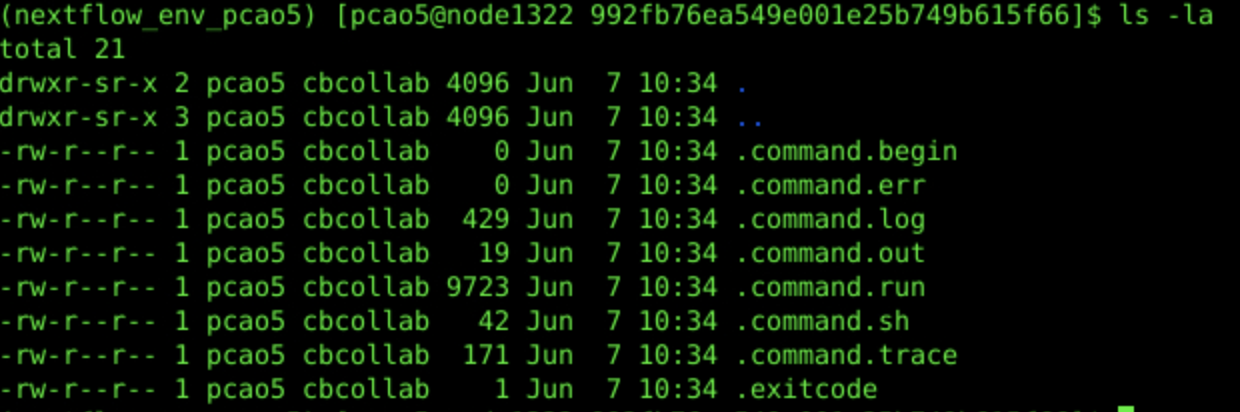
When Nextflow is ran on the cluster, there will be a work direcotry you can navigate to which will contain all the files associated with your particular pipeline(s), including the specific commands and parameters used to run your pipeline and produce results. In our example case, the folder inside of the work directory that contains our files of interest is /52/992fb/ and so we would run the following:
cd work/52/992fb76ea549e001e25b749b615f66/
ls -la
Nextflow Generated Commands:
The Actual Command Run:
cat .command.sh

#!/bin/bash -ue
echo 'Hello Blueno Bear!'
Slurm Wrapper Command:
cat .command.run

#!/bin/bash
#SBATCH -J nf-sayHello
#SBATCH -o /gpfs/data/cbc/workflow_workshop/work/52/992fb76ea549e001e25b749b615f66/.command.log
#SBATCH --no-requeue
#SBATCH --signal B:USR2@30
#SBATCH -c 2
#SBATCH -t 02:00:00
#SBATCH --mem 5120M
#SBATCH -p batch
NXF_CHDIR=/gpfs/data/cbc/workflow_workshop/work/52/992fb76ea549e001e25b749b615f66
# NEXTFLOW TASK: sayHello
...
/bin/bash -ue /gpfs/data/cbc/workflow_workshop/work/52/992fb76ea549e001e25b749b615f66/.command.sh &
...
Standard Out/Error:
cat .command.log
## SLURM PROLOG ###############################################################
##    Job ID : 10159219
##  Job Name : nf-sayHello
##  Nodelist : node1322
##      CPUs : 4
##  Mem/Node : 5120 MB
## Directory : /gpfs/data/cbc/workflow_workshop/work/52/992fb76ea549e001e25b749b615f66
##   Job Started : Wed Jun  7 10:34:20 EDT 2023
###############################################################################

Hello Blueno Bear!
Step 3: Run a 'Word Count' Example (A 2-Step Workflow)
Create a file called word_cout.nf and paste in the following :
3a. word_count.nf:
#!/usr/bin/env nextflow
nextflow.enable.dsl=2

params.name = "World"

process sayHello {
  input:
    val name
  output:
    path "hello.txt"
  script:
    """
    echo 'Hello ${name}!' > hello.txt
    """
}

process countWords {
  input:
    path(file_in)
  output:
    stdout

  script:
   """
   cat ${file_in}
   wc -w ${file_in} | awk '{print \$1}'
   """
}

workflow {
  countWords(sayHello(params.name)) | view
}
3b. Launch the Workflow:
Now, once you are in the directory where the count_words.nf file is located, run the following command to run the pipeline:
nextflow run count_words.nf --name "Blueno Bear"
3c. Workflow Output:

In the next iteration, we want to save the word count to a text file; so we add to the word_count.nf so that it looks like the following (just copy and paste this over what was there):
3d. count_words_and_save.nf
!/usr/bin/env nextflow
nextflow.enable.dsl=2

params.name = "World"

process sayHello {
  input:
    val name
  output:
    path "hello.txt"
  script:
    """
    echo 'Hello ${name}!' > hello.txt
    """
}

process countWords {
  input:
    path(file_in)
  output:
    path("count_words.txt")

  publishDir "${params.out_dir}/", mode: 'copy'

  script:
   """
   wc -w ${file_in} | awk '{print \$1}' > count_words.txt
   """
}

workflow {
  countWords(sayHello(params.name))
}
3e. Launch the Workflow
nextflow run count_words_and_save.nf --name "Blueno Bear" --out_dir words_out
Workflow Output (Custom Parameter):

Inspect the output directory words_out:
cat words_out/count_words.txt

3
In sum, we made the following changes to our word_count.nf file:
- added the directive
publishDir "${params.out_dir}/", mode: 'copy'tocountWords - and changed the
countWordsfunction to redirect output towc -w ${file_in} | awk '{print \$1}' > count_words.txt
Step 4: Run a reduced representation bisulfite sequencing (RRBS) Workflow
4a. rrbs_sequencing_single.nf:
#!/usr/bin/env nextflow
nextflow.enable.dsl=2

params.read = "/gpfs/data/cbc/workflow_workshop/sample1.fq.gz"

process trimmomatic {

  input:
    path(read)

  publishDir "${params.out_dir}/trimmed_reads", mode: 'copy'

  output:
    path("*_tr.fq.gz")

  script:
    """
      module load trimmomatic/0.39
      TrimmomaticSE ${read} ${read.getBaseName()}_tr.fq.gz ILLUMINACLIP:/gpfs/data/cbc/cbc_conda_v1/envs/cbc_conda/opt/trimmomatic-0.36/adapters/TruSeq3-SE.fa:2:30:5:6:true SLIDINGWINDOW:10:25 MINLEN:50
    """
}

process fastqc {
  input:
    path(read)

  publishDir "${params.out_dir}/fastqc_original_reads", mode: 'copy'

  output:
    path "*"

  script:
    """
      module load fastqc/0.11.5
      fastqc ${read}
    """

}

process fastqc_trimmed {

  input:
    path(trimmed_read)

  publishDir "${params.out_dir}/fastqc_trimmed_reads", mode: 'copy'

  output:
    path "*"

  script:
    """
      module load fastqc/0.11.5
      fastqc ${trimmed_read}
    """
}

process alignment {

  input:
    path(trimmed_read)

  publishDir "${params.out_dir}/alignments", mode: 'copy'

  output:
   path "*.sam.gz"
   path "*_report.txt"
   path "*_unmapped_reads.fq.gz"


  script:
   """
    module load bismark/0.20.0
    module load bowtie2/2.4.2
    bismark -o `pwd` --bowtie2 --genome /gpfs/data/shared/databases/refchef_refs/S_scrofa/primary/bismark_index --un --pbat ${trimmed_read}
   """

}

workflow
{
  fastqc(file(params.read))
  trimmed_result = trimmomatic(file(params.read))
  fastqc_trimmed(trimmed_result)
  alignment(trimmed_result)
}
...

#### 4b. Launch the Workflow:
```bash
nextflow run rrbs_sequencing_single.nf --read /gpfs/data/cbc/workflow_workshop/sample1.fq.gz --out_dir single_read_out
4c. Workflow Output:

4d. Inspect Workflow Outputs:
ls -R single_read_out


single_read_out:
alignments  fastqc_original_reads  fastqc_trimmed_reads  report.html  timeline.html  trimmed_reads

single_read_out/alignments:
sample1.fq_tr.fq.gz_unmapped_reads.fq.gz  sample1.fq_tr_bismark_bt2.sam.gz  sample1.fq_tr_bismark_bt2_SE_report.txt

single_read_out/fastqc_original_reads:
sample1_fastqc.html  sample1_fastqc.zip

single_read_out/fastqc_trimmed_reads:
sample1.fq_tr_fastqc.html  sample1.fq_tr_fastqc.zip

single_read_out/trimmed_reads:
sample1.fq_tr.fq.gz
Step 5: Run a reduced representation bisulfite sequencing (RRBS) Workflow [Using a Input Directory]
This example draws from our earlier example where we took the naive approach and used a number of schell scripts to create a makeshift pipeline to analyze RRBS data. Now we will do similar, but this time we will do it using Nextflow. Create a file named rrbs_sequencing.nf as follows:
5a. rrbs_sequencing.nf:
#!/usr/bin/env nextflow
nextflow.enable.dsl=2

...

workflow
{
  reads = Channel.fromPath(params.read_dir + "/*.fq.gz", checkIfExists: true)
  fastqc(reads)
  trimmed_result = trimmomatic(reads)
  fastqc_trimmed(trimmed_result)
  alignment(trimmed_result)
}
5b. Launch Workflow and Inspect Workflow Inputs:
Now, making sure you are in the directory where the rrbs-sequencing.nf file is located, run the pipeline as follows, making sure to specify where you inputs are (i.e., --read_dir) and where you want your output to go (i.e., --out_dir):
Launch Workflow
nextflow run rrbs_sequencing.nf --read_dir /gpfs/data/cbc/workflow_workshop/input_dir --out_dir multiple_read_out
Inspect the Input Directory:
ls -R /gpfs/data/cbc/workflow_workshop/input_dir

/gpfs/data/cbc/workflow_workshop/input_dir:
sample1.fq.gz  sample2.fq.gz
Inspect the Output
ls -R multiple_read_out

multiple_read_out/:
alignments  fastqc_original_reads  fastqc_trimmed_reads  report.html  timeline.html  trimmed_reads

multiple_read_out/alignments:
sample1.fq_tr.fq.gz_unmapped_reads.fq.gz  sample1.fq_tr_bismark_bt2_SE_report.txt   sample2.fq_tr_bismark_bt2.sam.gz
sample1.fq_tr_bismark_bt2.sam.gz          sample2.fq_tr.fq.gz_unmapped_reads.fq.gz  sample2.fq_tr_bismark_bt2_SE_report.txt

multiple_read_out/fastqc_original_reads:
sample1_fastqc.html  sample1_fastqc.zip  sample2_fastqc.html  sample2_fastqc.zip

multiple_read_out/fastqc_trimmed_reads:
sample1.fq_tr_fastqc.html  sample1.fq_tr_fastqc.zip  sample2.fq_tr_fastqc.html  sample2.fq_tr_fastqc.zip

multiple_read_out/trimmed_reads:
sample1.fq_tr.fq.gz  sample2.fq_tr.fq.gz
Step 6: Advanced - Run a reduced representation bisulfite sequencing (RRBS) Workflow [Using Docker]
A huge benefit of running pipelines with Nextflow is that we can create reproducibility of our analyses and results through the use of containers. Nextflow pipelines can pull and use containers from a variety of sources, one popular source being DockerHub.
6a. Find an update-to-containerized version of FastQC
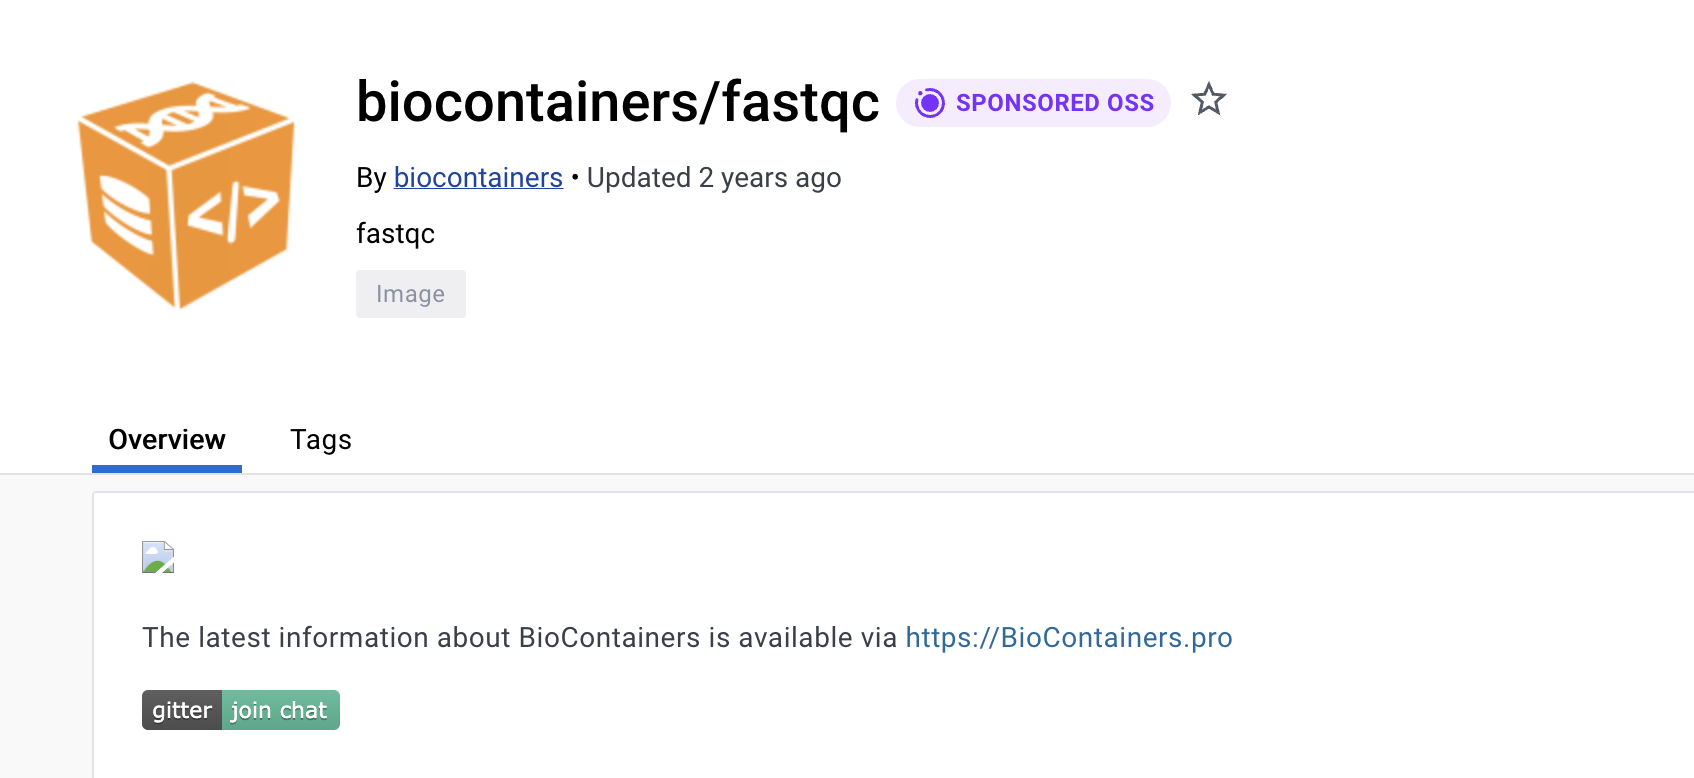
Find the container that fits your analysis needs at Dockerhub (hub.docker.com). For this example, we will use the Docker container found here:
https://hub.docker.com/r/biocontainers/fastqc/tags
Now we need to add this container information into our pipeline by altering the rrbs_sequencing.nf file as follows:
6a. rrbs_sequencing_docker.nf:
#!/usr/bin/env nextflow
nextflow.enable.dsl=2


process fastqc {
  input:
    path(read)

  publishDir "${params.out_dir}/fastqc_original_reads", mode: 'copy'

  container 'biocontainers/fastqc:v0.11.9_cv8'

  containerOptions '--bind /gpfs/data/cbc:/gpfs/data/cbc'

  output:
    path "*"

  script:
    """
      fastqc ${read}
    """

}
6c. Launch Workflow:
Now we can run the workflow and it will pull the container we need (converting it to a singularity image so it can be used on OSCAR) to run the analysis:
nextflow run rrbs_sequencing_docker.nf --read_dir /gpfs/data/cbc/workflow_workshop/input_dir --out_dir docker_out
That's it! Now you should be ready to go and use Nextflow on OSCAR for your own research purposes!